How To Make An Android App With Android Studio
So you want to make an Android app for fun or profit using Android Studio? This guide is an updated “How To” covering the basics of setting up Android Studio and building a simple application.
Originally published on the rexstjohn.com blog

- ios
- android
Originally published at rexstjohn.com on November 12, 2013. Recovered from the Internet Archive.
So you want to make an Android app for fun or profit using Android Studio? This guide is an updated “How To” covering the basics of setting up Android Studio and building a simple application.
Side note: My Android skills were somewhat rusty after having spent most of the last year doing pure native iOS, this book was extremely helpful to me: Android Programming: The Big Nerd Ranch Guide (Big Nerd Ranch Guides).
This guide will cover the following:
- A lightweight overview of a few core Android concepts
- Setting up and installing necessary Android tools
- Creating a simple PageView application
- Some very basic interface design
- Running the application in an emulator and seeing it work
Step 1: Get Installed
Please do the following before we get started:
- Download Android Studio from this link: <http://developer.android.com/sdk/installing/studio.html>
- Follow the installer instructions posted by Google as per your operating system
Installing Android SDKs In Android Studio
Once you have installed Android Studio, you will now need to download a collection of tools and SDKs required to produce a modern Android application.
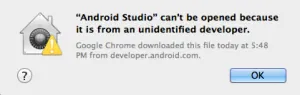
Note: If you are on OSX Mavericks you might get a message stating “Android Studio Can’t be opened because it is from an unidentified developer.”
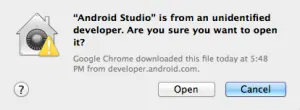
To get around this issue, navigate to the directory in Finder and “Control + Click” the Android Studio application and then click “Open” from the menu. You will then receive a new dialog which now has an “open” option. Problem solved.
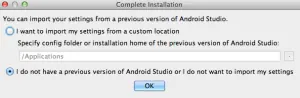
Just skip this dialog by clicking “ok” here unless you have a previous installation you’d like to import settings from.
We should now be ready to start doing fun Android things…such as installing a whole bunch of SDKs and utilities!
Install All The Things
Note: You can skip this if you already have Android 4.4 related items installed. Otherwise, it may be helpful just to get a sense of what the possibilities are for working with different Android flavors.
Android Studio comes default with some basic Android tools to get up and running but it never hurts to get the latest of whatever you are developing on.
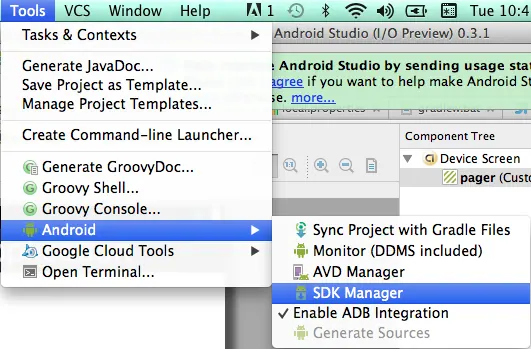
Begin by navigating to Tools->Android->SDK Manager.
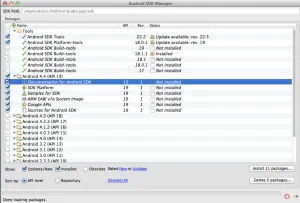
This is the Android SDK Manager. You can install any older flavor of Android here as well as older tools for working with those prior Androids. For now, just verify that the 4.4 SDK is installed (just click the top level folder for 4.4 and it will select everything in that folder) and then make sure “Android SDK Tools” and “Android Platform Tools” have been selected as well.
Now click “Install 11 packages down at the bottom.”
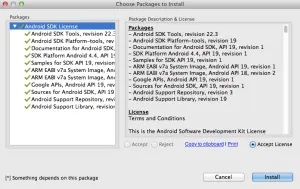
Click the top-level item in the left hand pane and then click “Accept License” and then “Install.” Things should begin installing now.
Time For Your First Project
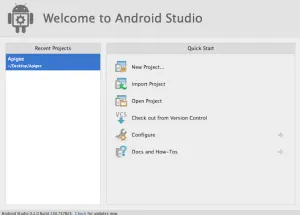
You will now see the following.Because we are creating a new application, we shall select “New Project” at the top.
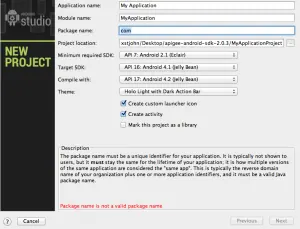
As you can see there are a large number of possible configurations you can target here as well as custom Android themes you can select. Styles and themes are a way to globally configure the look and feel of your Android app, read more about this topic here.
You can also select a minimum SDK target and target as well as a few other options which are not of importance at this time. If you ever want to build an app and release it to a wide range of users across many devices these settings become increasingly important.
The package name is what is known as a “namespace.” Essentially this is a unique identifier to prevent other applications from getting your files confused with theirs. The form of name spaces takes a “com.x.y” format and is partially based on the domain name formatting of the world wide web.
Go ahead and do the following:
- Change the application name field to “Hello World”
- Change the package name to “com.hello.world”
- Click “Next”
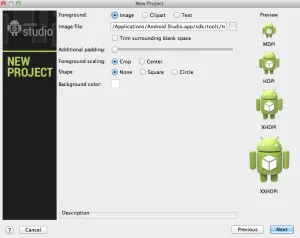
This screen allows you to set a custom Android app icon. If no icon is selected, the default green droid icon will be used. If you have a custom icon, provide Android Studio with the path and it will show how the icon renders given different screen sizes and resolutions on the right hand side. You may also apply some limited default modifications to your icon appearance.
Click “Next” again on this screen.
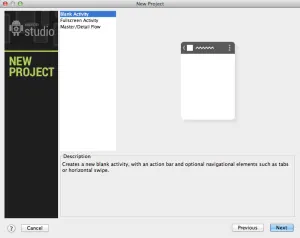
Three options here. The “Blank Activity” contains nothing and it will be up to you to provide the initial view yourself aside from a navigation bar. For the “Fullscreen Activity,” the navigation bar is hidden. The “Master / Detail Flow” option is generally suited for tablet applications and contains an arrangement of sub-views common for viewing a list of elements and a large detail element.
For now we will just stick with the blank activity.
Click “Next” again.
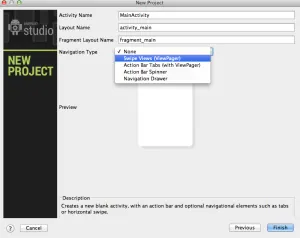
I will provide some brief detail on the options here. An “Activity” is the fundamental view structure for Android. You can think of an Activity as a “Screen.” A layout is an Android concept captured in an “.xml” file which states what elements will appear inside the main Android activity such as buttons, sliders and other fun controls. A “Fragment” is a UI subcomponent which is meant to provide the benefit of reusability. A fragment is sort of like a mini-activity which can occur inside an Activity and has it’s own life cycle. They even have their own activities called “FragmentActivities” which likewise provide the benefit of transferability. You can even use multiple fragments together on the same screen.
Select the “Navigation type” drop down and choose “Swipe Views.” These options encapsulate some common Android app structures and are provided as basic navigation templates.
Choose “Finish.”
 Note: Gradle is what is known as a “build automation” tool. Basically what it does is magically take care of setting up your Android app and configuring it properly given all the settings you selected during the set up process.
Android Studio Project Overview
Now lets explore what is contained in an Android Studio project. There are some folders and various files here, many of which you can ignore most of the time and are generated automatically. I won’t cover everything but I will visit some of the main parts.
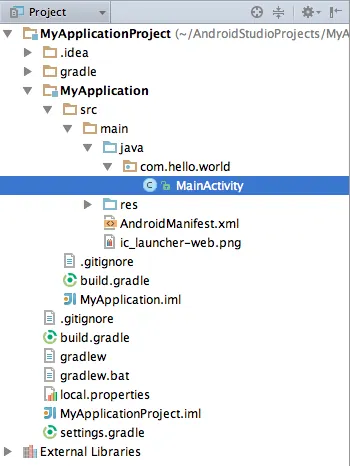
Note: If your left-hand project navigator is not open by default, select (from the Android Studio toolbar): View -> Tool Windows -> Project.
“.idea”
This folder contains project specific configuration files (generally in XML form) which contain data about how this project is stored. Since Android Studio was created based on JetBrains‘s Android IDE “IntelliJ IDEA” it is logical that the folder be called “.idea.” You don’t need to worry about this folder.
“gradle”
As mentioned above, Gradle is a build automation tool. You don’t need to worry about this folder either, it is part of the build process. If you are interested, read more about Gradle here.
You will likewise see many other Gradle-related files present here which you can ignore.
“Res”
This folder holds a bunch of XML files, layouts and media which will be available to your Android app. The Rest folder also allows targeting of different screen resolutions with different asset types e.g. high resolution images for pixel-dense devices and low resolution images for older devices. It also contains menu and layout files for specifying how your app will look. This folder is automatically compacted into what is called an “R-file” located under “source.r.debug.com.hello.world.R” which may later be used to reference and load resources stored in this folder in a straightforward manner.
In prior Android development environments the process of generating this R file automatically sometimes was a bit iffy and assets which had been added to the Res folder sometimes didn’t get properly indexed forcing you to manually initiate the generation process (and resulting in no shortage of hair pulling).
“MainActivity”
As mentioned previously, MainActivity manages the starting window or “view” of your application where all the action will occur. More on that later.
“AndroidManifest.xml”
The Android Manifest file contains a number of important application details. Unlike the other files we have looked at so far, chances are you will wind up modifying this file yourself at some point. For now, the main bullet points are that you use the Android Manifest to define the structure of the activities in your application, the target SDKs, your app icon, any permissions your application needs to make use of Android operating system features, your app version number and a few other things. Read more detailed covered about the manifest here.
Open this folder and click on “AndroidManifest.xml.”
You should see the following.
<?xml version="1.0" encoding="utf-8"?>
<manifest xmlns:android="http://schemas.android.com/apk/res/android"
package="com.hello.world"
android:versionCode="1"
android:versionName="1.0" >

<uses-sdk
android:minSdkVersion="7"
android:targetSdkVersion="18" />

<application
android:allowBackup="true"
android:icon="@drawable/ic_launcher"
android:label="@string/app_name"
android:theme="@style/AppTheme" >
<activity
android:name="com.hello.world.MainActivity"
android:label="@string/app_name" >
<intent-filter>
<action android:name="android.intent.action.MAIN" />

<category android:name="android.intent.category.LAUNCHER" />
</intent-filter>
</activity>
</application>

</manifest>
Looks cool right? You will notice a number of the elements I outlined above listed here in XML format. For now just close it and forget about it for the time being.
Note: You will notice mentions of “Intents” and “Intent Filters.” Intents are kind of like Android’s messaging system. The entire Android operating system is built around the ability of applications to send messages to one another and put various types of details inside those messages. “Intent” is just a fancy word for these messages. Intent-Filters are signals you can give the Android operating system to indicate that you are interested in receiving certain types of messages which your app might otherwise not need to know about. More comprehensive details on Intents (a very important Android concept) can be found here.
Time To Look At Activities And Life Cycles
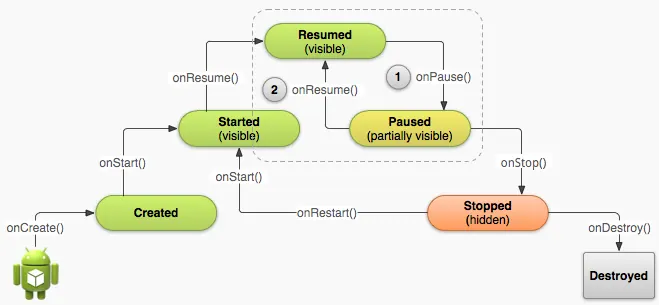
Open “MainActivity” by selecting it. I won’t post the entire file here, but for now just look at “onCreate.”
java @Override protected void onCreate(Bundle savedInstanceState) { super.onCreate(savedInstanceState); setContentView(R.layout.activity_main); // Create the adapter that will return a fragment for each of the three // primary sections of the activity. mSectionsPagerAdapter = new SectionsPagerAdapter(getSupportFragmentManager()); // Set up the ViewPager with the sections adapter. mViewPager = (ViewPager) findViewById(R.id.pager); mViewPager.setAdapter(mSectionsPagerAdapter); } |
onCreate is one of several Activity lifecycle events and is triggered when your Activity is first started. To view the others see the graphic above. Each one of these life cycle events exposes a function which you can use to do things such as saving data or restoring data from a save file or clean up items in memory (house keeping).
onCreate recieves a Bundle instance (effectively, a package of data handed to the Activity by the Android operating system which contains important information about the state of affairs).
setContentView() takes in a “layout” file from your “res” folder discussed above. Resources in the “res” folder are generally accessed using the R.x.y format which mirrors the folder structure in “res.”
After that we have some generated boilerplate for creating the default Sections Pager which we specified during the “New Project” creation process.
Investigating Layouts and Fragments
In the left hand project navigator click on res -> layout -> activity_main.xml
You will now see the activity layout view as below.
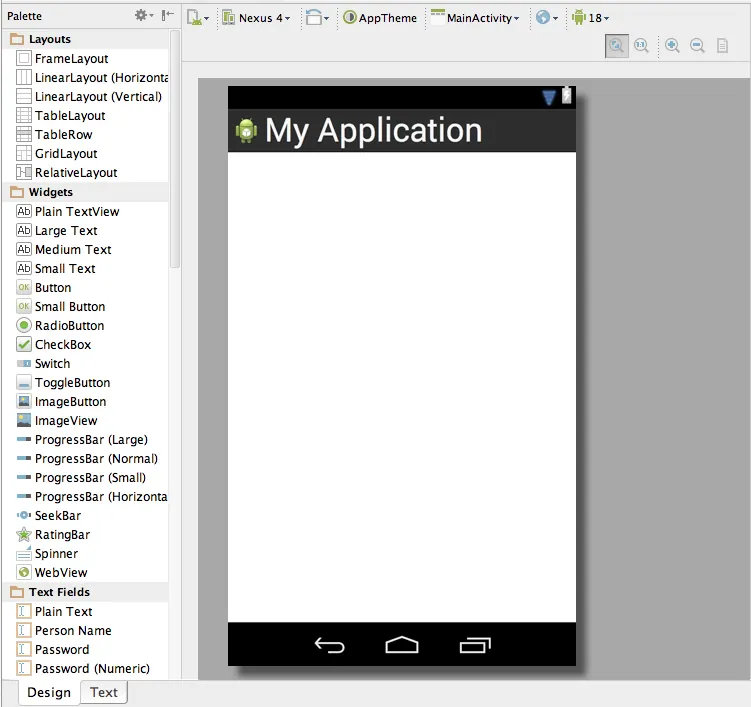
Note: At any time you can flip back and forth between the XML representation of the layout and the visual representation by toggling the “Design / Text ” button on the lower left hand corner.
Your XML will look like this:
<android.support.v4.view.ViewPager xmlns:android="http://schemas.android.com/apk/res/android"
xmlns:tools="http://schemas.android.com/tools"
android:id="@+id/pager"
android:layout_width="match_parent"
android:layout_height="match_parent"
tools:context=".MainActivity" />
As you can see, the “Pager” control you specified during initial setup is listed here along with some layout options. The “match_parent” adjective effectively just tells the pager to fill the activity which contains the pager aka it’s “parent.” The Android “id” field is the key for this sub-component which you can use to reference it from your Java code if you need to later on. The “xmlns” lines at the top specify the “XML Namespace” being used in this particular layout file. Basically, there might be many different ways of interpreting this XML file and, by explicitly mentioning the xmlns the layout file is using, the tool set which renders this layout on-screen knows how to interpret it precisely.
Finally, “android.support.v4.view.ViewPager” is an instruction which states that this layout defines an instance of the ViewPager class.
Now lets take a look at the fragment_main.xml file which contains the following XML:
<RelativeLayout xmlns:android="http://schemas.android.com/apk/res/android"
xmlns:tools="http://schemas.android.com/tools"
android:layout_width="match_parent"
android:layout_height="match_parent"
android:paddingLeft="@dimen/activity_horizontal_margin"
android:paddingRight="@dimen/activity_horizontal_margin"
android:paddingTop="@dimen/activity_vertical_margin"
android:paddingBottom="@dimen/activity_vertical_margin"
tools:context=".MainActivity$PlaceholderFragment">

<TextView
android:id="@+id/section_label"
android:layout_width="wrap_content"
android:layout_height="wrap_content" />

</RelativeLayout>
As mentioned before, a Fragment is meant to be a reusable sub-component of an Activity which provides the benefit of overall portability and the ability to combine multiple fragments on the same screen, each having their own separate control logic (yet can still communicate with one another via Intents).
At the top of this Fragment you will see a “Relative Layout” specified. Relative Layout is one of several common Android layouts which allow you to define how sub-elements are arranged within the screen. They may be used (in combination with an Adapter) to create lists and grids of data, show elements one-on-top-of-the-other (FrameLayout) or in linear fashion (Linear Layout), among other things. Relative Layout means that the items on the screen are positioned in relation to one another.
Also included is a basic “TextView” which is effectively just a text display area. Remember, the “id” field allows us to reference this TextView from our Java MainActivity file. More on that later, for now, lets just run our little app and see what happens.
Running The App
Because there are so many Androids out there, Google has taken a number of steps to attempt to tame the fragmentation issue. In the meantime, we still must face a world where we can run any number of Android emulators. In general, most Android developers I know prefer (by far) to test on their devices as the testing process tends to be much faster.
The emulator has traditionally been very slow, but there are some things you can do to speed it up. The slowness generally results from the emulator having to translate ARM instructions (what most mobile chipsets use) into x86 instructions (what most PCs use). Apple gets around this by faking it using a “simulator” (which pretends to be iOS) rather than an “emulator” (which literally is running the same way that a device would).
To begin, click the “Run” button in Android Studio to compile your basic application. You should see this screen next:
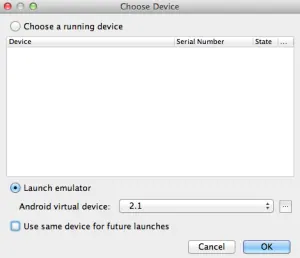
If you have an Android device plugged in and set up in debug mode it will show up on this screen in the “Choose a running device” panel. You must follow the above linked directions to get your Android device debuggable though.
If not, we will need to worry about the emulator.
Click the “…” button next to the drop down with the label “Android virtual device.” Android virtual devices or AVDs (for nerds) are simply canned versions of Android you can use to emulate your target environment.
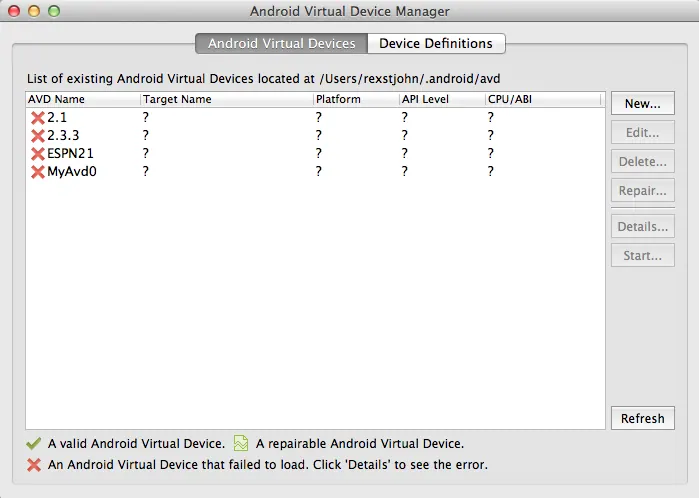 You should see the above screen (minus all the old AVDs that I have on my system). We need to add a new Android AVD so click “new” on the right.
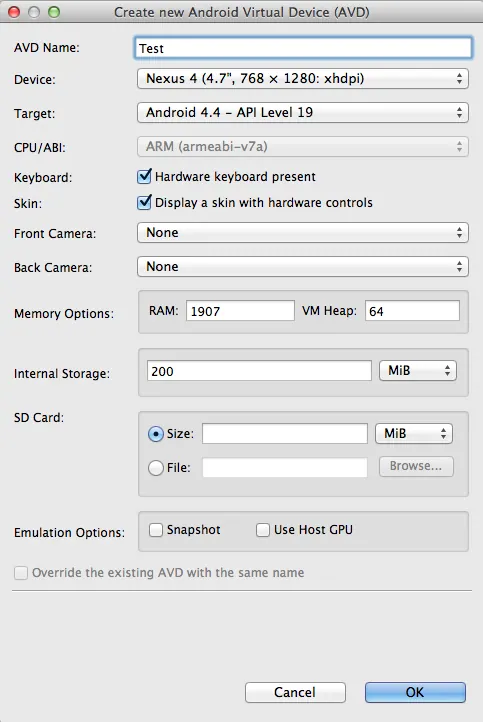
Configure your new AVD like this. I used Nexus 4 as my device, Android 4.4 and left the rest of the settings as default (unmodified). Now click “Ok.”
Now, return to the “Choose A Device” screen, select “Test” from the drop down and then click “OK” to start the emulator. This process may take some time (emulator is slow to start generally). I recommend leaving the emulator running while you develop to avoid having to start it up again every single time you want to check your progress. Favor using a real device over the emulator for speed.
Note: By the time your Android emulator starts it will begin with a lock screen. In order to install your new Android app on the AVD, you must unlock the emulator by sliding the lock off to the side. Otherwise, you may get a message along the lines of “Error: Could not access the Package Manager. Is the system running?” in the output of the console.
You should see the following:
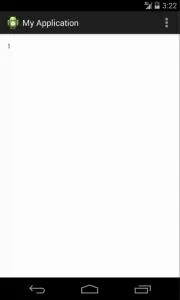
The default behavior of the “Pager” we saw earlier is to show the page number. There are three. Try swiping from right to left and you should see the “1″ in the upper left hand corner update to become a “2″ and “3″ as you swipe.
If you are interested in diving deeper with Android, I also recommend this book:Android Programming: Pushing the Limits. The iOS version of the “Pushing the Limits” series is also very good.